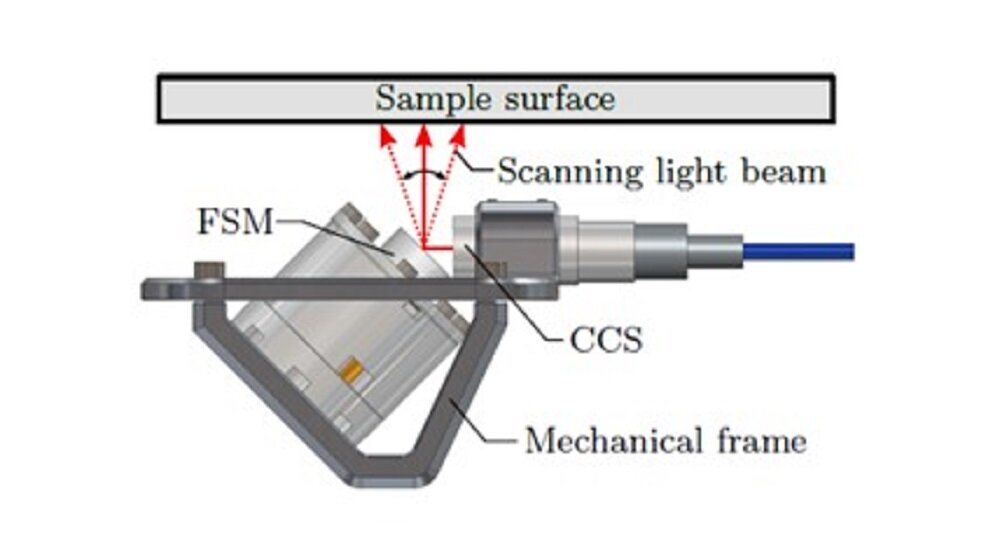
To create a system that can take measurements in the vibration-prone environment of an industrial plant, the researchers combined a 2D integrated fast steering mirror (FSM) with a high-resolution 1D confocal chromatic sensor (CCS). The FSM is used to manipulate the optical path of the sensor, scanning the measurement spot quickly and accurately across the respective surface area. Credit: Daniel Wirtjans, Christian Doppler Laboratory of Precision Engineering for Automated Linear Scales
Researchers have developed a lightweight optical system for 3D scanning of surfaces with a micron resolution. The new measuring instrument could greatly enhance the quality control inspection of high-tech products including semiconductor wafers, solar panels and consumer electronics such as flat-panel televisions.
Because vibrations make it difficult to capture accurate 3D measurements on the production line, samples are taken periodically for laboratory analysis. However, any defective products made while waiting for results should be discarded.
To create a system that could operate in a vibration-prone environment in an industrial plant, the researchers, led by Georg Scheitter of Technische Universität Wien in Austria, combined a fast 2D orientation mirror with a high-resolution 1D confocal chromatic sensor.
“Robot-based inspection and measurement systems like what we have developed can enable 100% quality control in industrial production, replacing existing sample-based methods,” said Ernst Csencsics, who co-led the research team with Daniel Wertjanz. “This creates a more efficient production process because it saves energy and resources.”
As described in the Journal of the Optical Society (OSA) Applied opticsThe new system is designed to be installed on a tracking platform on a robotic arm to take 3D measurements of random shapes and surfaces. It weighs only 300 grams and measures 75 x 63 x 55 mm cubes, which is the size of an espresso cup.
“Our system can measure the topography of 3D surfaces with an unprecedented combination of flexibility, accuracy and speed,” said Wertjanz, who is pursuing a Ph.D. on this research topic. “This results in less waste because manufacturing problems can be identified in real time, and processes can be quickly adapted and improved.”

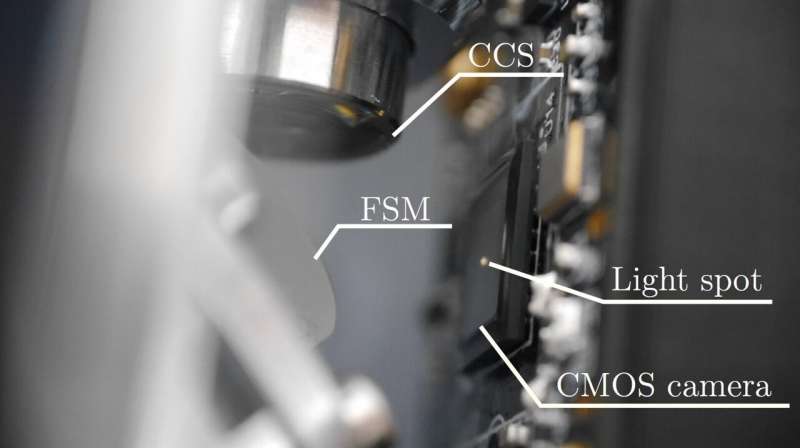
The image shows the new system during the calibration process involving the CMOS camera. The spotlight where the measurements are taken can be seen as well as the fast steering mirror (FSM) and confocal chromatic sensor (CCS). Credit: Daniel Wirtjans, Christian Doppler Laboratory of Precision Engineering for Automated Linear Scales
From lab to fab
Precise measurements are usually made with bulky instruments in the laboratory. To bring this capability to the production floor, the researchers developed a system based on the 1D confocal chromatic distance sensor developed by Micro-Epsilon, a partner in this research project. Colorimetric confocal sensors can accurately measure displacement, distance, and thickness using the same principles as confocal microscopes but in a much smaller package.
They combined the focal sensor with a highly integrated speed-guidance mirror that they had previously developed, which is only 32mm in diameter. They also developed a reconstruction process that uses measurement data to create a three-dimensional image of the topography of the sample’s surface. The 3D measurement system is compact enough to fit into the measurement platform, which acts as a linkage for a robotic arm and compensates for vibrations between the sample and measurement system through active feedback control.
“By manipulating the optical path of the sensor with a fast-guiding mirror, the measurement spot is quickly and accurately scanned across the respective surface area,” Wertjanz said. “Because only a small mirror needs to be moved, scanning can be done at high speeds without compromising accuracy.”
To test the new system, the researchers used different calibration parameters featuring structures with specific lateral sizes and heights. These experiments showed that the system could obtain lateral measurements of 2.5 μm and axial resolution of 76 nm.
“This system could eventually bring a variety of benefits to high-tech manufacturing,” Wertjanz said. “Direct measurements can enable fault-free production processes, which is particularly useful for low-volume manufacturing. The information can also be used to improve manufacturing process settings and machine tools, which can increase overall productivity.”
The researchers are now working on implementing the system on a measurement platform and integrating it with a robotic arm. This will allow them to test the feasibility of accurate 3D robot-based measurements on free-form surfaces in environments subject to vibration such as an industrial production line.
Daniel Wertjanz et al., A scanning confocal chromatic sensor that enables precise 3D measurements, Applied optics (2021). DOI: 10.1364 / AO.428374
the quote: Compact system designed to perform high-precision robot-based surface measurements (2021, August 23) Retrieved on August 23, 2021 from https://phys.org/news/2021-08-compact-high-precision-robot-based-surface .programming language
This document is subject to copyright. Notwithstanding any fair dealing for the purpose of private study or research, no part may be reproduced without written permission. The content is provided for informational purposes only.

“Wannabe internet buff. Future teen idol. Hardcore zombie guru. Gamer. Avid creator. Entrepreneur. Bacon ninja.”


